Membership Service in ASP.Net 2.0

Membership Service in ASP.Net 2.0
Published on http://asp.net on 10/16/2008

Wednesday, October 26, 2005

VC++.Net - Editor incorrectly formats CONTROL statements

Issue

This was not a problem under Visual Studio 6. But in VS 2003.Net it persists.

It appears that in some situations the editor incorrectly formats CONTROL statements. This only seems to happen when the control has a Help ID, but it does not always happen even then.

An example:

CONTROL "",IDC_CFG_LISTER_ITEM_COLOUR_FG,"dopus.dropdown.button", 0x5,137,16,30,13,0,0,HIDC_CFG_LISTER_ITEM_COLOUR_FG

In this example, there is one too many parameters. The ",0,0" preceding the HIDC_xxx should only be ",0", eg:

CONTROL "",IDC_CFG_LISTER_ITEM_COLOUR_FG,"dopus.dropdown.button", 0x5,137,16,30,13,0,HIDC_CFG_LISTER_ITEM_COLOUR_FG

When this resource script is complied it produces the following errors:

Compiling resources....\language.rc(290) : error RC2111 : invalid control type.\language.rc(290) : error RC2113 : END expected in dialog.\language.rc(291) : error RC2135 : file not found:.\language.rc(292) : error RC2135 : file not found:.\language.rc(294) : error RC2108 : expected numerical dialog constant

Removing the erroneous ",0" fixes the problem, however the next time any dialog in the resource file is edited, the ",0"s are all put back in.


Workaround

Workaround would be to set the HELP ID property dynamically at runtime.

You can follow the below steps to achieve this:

Let us assume we want to add help id to a TAB control having ID IDC_TAB1.
Open resource.hm file and add the #define as given below to specify value for HELP ID

#define HIDC_TAB1 1000 // some unique value for each control

If resource.hm file does not exist add a new file by name “resource.hm” in the Headers folder of the project. Also add, #include reaource.hm file in dialog editor’s header file.

Go to ::OnInitDialog() function of the Dialog and add the following code.

BOOL CSRTestDlg::OnInitDialog()
{
CDialog::OnInitDialog();

----
----

CWnd* pwnd = this->GetDlgItem(IDC_TAB1);
pwnd->SetWindowContextHelpId(HIDC_TAB1);

return TRUE; // return TRUE unless you set the focus to a control
}

The same is depicted in the figure below:-


However, you would be happy to know, that the issue is fixed in VS2005.Net.
Using VS2003.Net, we created a MFC application (dialog box editor) and added a Tab control on to the editor. Build fails and enumerates the compilation errors as posted by you.

Then the same was emulated using VS2005.Net and the solution build perfectly without any compilation errors. Opening the .rc file complied with VS2005.Net in notepad, you will find that the code generated is what is below:-

CONTROL "",IDC_TAB1,"SysTabControl32",0x0,53,33,50,30,0,HIDC_TAB1

In VS2003.Net, the same procedure resulted in

CONTROL "",IDC_TAB1,"SysTabControl32",0x0,53,33,50,30,0,0,HIDC_TAB1

Part I - Deployment of Office-based Applications(VSTO)

Issue

Create a simple VSTO project, deploy to localhost. If you transfer these files to a computer that has never had Visual Studio 2005 installed, open the workbook, delete Sheet1, then save the workbook under a new name, opening the workbook results in an error that the customization assembly cannot be found.

Resolution

One possible workaround that the you may be able to employ is to rename Sheet1 so that it has a unique name that is not likely to be reproduced and then set the XLSheetVisibility property of this sheet using VBA code so that it is set to xlSheetVeryHidden.By hiding the worksheet in this fashion it would make it more difficult for the client to delete this worksheet from the workbook. The problem as originally understood from the repro steps was that if the user deleted Sheet1 from the Excel workbook that was part of a VSTO solution that once they saved, closed and then reopened the workbook they received the error that the "Customization assembly could not be found or could not be loaded". Based on the description of the problem and as a result of tests if the user was to delete Sheet2 or Sheet3, given the workbook that was provided, then the problem does not occur and the VSTO code successfully loads.So by renaming and hiding Sheet1 from the user it would be less likely that they would delete this sheet and thereby prevent the scenario which results in the error while still allowing the VSTO code to execute. An assumption is made that there is no code contained within the Sheet1 class and/or no .NET controls residing on Sheet1.

It is often recommended that users do not delete sheets from a workbook that is part of a VSTO 2005 solution.

Another way you could do it is to follow the following

There may be another option which would prevent the error from occurring.

If the "Trust access to Visual Basic Project" option is enabled within Microsoft Excel then if the user deletes Sheet1 and there is no code behind or controls on this sheet they should be able to save, close and then reopen the workbook without receiving the error and the VSTO code should still execute.I would also indicate that changing this setting could pose a potential security hazard.By enabling this setting you are allowing macros or automation code to have access to the core Visual Basic objects, methods, and properties which could potentially allow malicious code to be inserted into a workbook and then be executed when the workbook is opened.

For more information please see the url below.http://office.microsoft.com/en-us/assistance/HA011403191033.aspx

Tuesday, September 27, 2005

Deploying ASP.Net 2.0 Beta 2 applications

Issue

You build a simple web application using .NET and SQL Express beta 2. Add a setup project to the solution. If the target machine has the .NET framework beta 2, setup runs fine. If not, the user is presented with the .NET framework license agreement, and it begins to automatically download 3 files. On the 2nd file, it terminates with a message indicating that WindowsInstaller-KB884016-v2-x86.exe has changed since it was initially published.

Resolution

1. When you add a web setup project to website solution created using VS 2005 Beta 2à right click on the WebSetup1 and WebSetup1 Property Pages would open up.

2. Click on the “Settings” button and the Pre-requisites page would open up. Uncheck the “Create setup Project” at the top as you can see in the screen. Click Ok.

3. Build the website. Then, add the Project Output Group to the WebSetup1.

4. Build the WebSetup1 Project. Open the website folder where the solution is i.e. “\\My Documents\Visual Studio 2005\Projects\YourWebSite\WebSetup1\Debug” and you will have only the .msi file.

5. Download the bootstrapper_sample.exe from Microsoft site.

http://www.microsoft.com/downloads/details.aspx?FamilyId=BF253CFD-1EFC-4FC5-BA7E-6A6F21403495&displaylang=en

This is a self-extracting executable, and will produce two files when run: Setup.exe and Setup.ini. Place these in the same directory as your MSI file.

6. You will also need to obtain the .NET Framework Redistributable Package (Dotnetfx.exe). In your case, this would be NET Framework Version 2.0 Redistributable Package Beta 2 (x86)
http://www.microsoft.com/downloads/details.aspx?FamilyId=7ABD8C8F-287E-4C7E-9A4A-A4ECFF40FC8E&displaylang=en

7. Place Dotnetfx.exe in the same directory as your MSI and the Bootstrapper sample files. These four files (Setup.exe, Setup.ini, Dotnetfx.exe, and your MSI file) constitute your new installation package

8. Before copying these files to the target machine, you need to make some changes to Setup.ini. Open Setup.ini in a notepad, and change the following lines.


Msi=FxCopSourceSetup.msi should be changed to Msi=NameofMSIFile.msi (your MSI).
'FxInstallerPath=c: should be uncommented. For instance, FxInstallerPath=. in case the Dotnetfx.exe is in the same directory as setup.exe. Finally it would look something like below:-


Then copy these onto target machine and run Setup.exe and it will install .Net FRamework 2.0 Beta 2 and webiste can be deployed successfully.

Enjoy!!!!!!!!!!!!!!

Thursday, August 18, 2005

Site Navigation in ASP.Net 2.0 - Part I

Site Navigation

All of the web applications developed usually have more than one page and they are usually interconnected via some mechanism. In ASP.Net 1.x, navigation was made possible by using hyperlinks with the help of include file or user controls. They are pretty handy but not so much when the pages are moved around or their names change.

So in order to overcome this drawback, ASP.Net 2.0 introduces the new Site Navigation System. Site navigation uses the layered architecture. Controls such as Menu and TreeView provide the navigation UIs. Classes such as SiteMap and SiteMapNode provide the API that the controls rely on and also constitute an API you can use yourself if you wish. Site navigation is provider-based, and the one site map provider that comes with ASP.NET 2.0 -->XmlSiteMapProvider --> reads site maps from XML data files. By default, those files are named Web.sitemap.

Lets us discuss each on of them one at a time.

Site Maps

Site Maps help us define the layout of all the pages in the application and their inherent relation with each other. For this, one could either use the SiteMap Class or the SiteMapDataSource control.
SiteMapDataSource controls use site map providers to read site maps. They then provide the site map data to the controls they're bound to. Binding a TreeView to a SiteMapDataSource transforms each node in the site map into a TreeView node; binding a Menu to a SiteMapDataSource transforms each node in the site map into a menu item. The only site map provider that comes with ASP.NET 2.0 is XmlSiteMapProvider. It enables site maps to be read from XML files that conform to a predefined schema

Take up the following steps to create a site map-->

  • Start Visual Studio 2005 IDE.
  • Create a new ASP.Net website using C# as language on file system.
  • Right Click on solution and add a new item. From the Add item Wizard, add a new site map. Let the name be Web.sitemap (default name)
  • Add the following code to it:-

Only one sitemap element can be there in the site map file and there can be multiple siteMapNode element within the root node i.e. sitemap

Within the siteMapNode element, we have following attributes -->

  • Title --> This is actual description which appears as a hyperlink.
  • Description --> Tool Tip which comes up when we hover over that particular siteMapNode.
  • url --> this is the file located within the solution. It can be located within the root folder or within a sub-folder created within the solution.
  • Role --> the roles to which the links should be accessible.

    "Security trimming" refers to SiteMapDataSource's ability to hide nodes from users who lack proper authorization. Authorization is role-based and is enacted by including roles attributes in siteMapNode elements. Of course, you can use ASP.NET 2.0 Role Management service to define roles and map users to roles. Security trimming is disabled by default in XmlSiteMapProvider. You can enable it by including these statements in Web.config.

SiteMapPath Control

This control creates a navigation hierarchy what is sometimes referred to as Bread crumb navigation. The SiteMapPath control does not need a data source. All one needs is to drag and drop a SiteMap path control onto the page and you all have the results at your disposal. You can change the properties such as the depth of the hierarchy and styles.

Wednesday, August 17, 2005


Role Management in ASP.Net 2.0


As stated before, role management service deals with the authorization i.e. granting access and managing roles of each of the user registered with the web site.

Unlike Membership service which can either use the login server controls to achieve the task, role management service does not offer any server controls. All you have are a set of role management APIs within the system.web.security namespace.

Since ASP.Net 2.0 has a provider based model, role management also uses a set of providers for authorization. By default Beta 2 provides support for SQL Express only. For the remaining data stores you have to explicitly create a provider. I’ll be explaining every thing with respect to the SQL Provider that we created earlier for membership provider. To achieve the same, we will be going back to web.config file of our website solution that we created earlier.

Add the following section to the web.config file:-


Unlike membership service, role manager needs to enabled explicitly for it to work as specified by enabled="true".
Change the value against the type attribute with what you have in machine.config file as explained before.Also, note the connection string name is same as what we created earlier. For conveniece I am re-writing the same.


aspnetdb is the database which contains table for role managements as well.

Let’s assume you have folder Admin which has certain pages that should be accessible to only to the user with administrator rights. For this follow the following steps -->

  1. Create a new web.config file within the Admin folder by right clicking on the folder name and click “Add new Item”. Select the web.config file and click Add.
  2. Once done, add authorization section so that web.config file within the Admin folder looks something like as stated below -->

3.Now run the ASP.Net website configuration tool once again by navigating to Website--> ASP.Net configuration from the IDE menu. Once the ASP.Net configuration page opens up in the browser click on the provider tab and select link which states “select a different provider for each feature (Advanced)”.


Though I have demonstrated this to you earlier, below screenshot shows the new role provider is added to existing list of providers.

Now your web.config file is all set to use role management service.
Create another web “Manage.aspx” within the admin folder of the website solution. It looks something shown below:-

The source code for the same is:-

The above code is interface that the user will be presented with when he tries to create a new role or delete role if no user assigned to that role. It also delete role if any user is assigned to it. Please note that when a role is deleted with the users in it, those users would not be deleted from other roles.

When the page is run, it presents the user with the set of existing roles in the listbox.
For that you need to add a page load event with the following code:-

Roles in a membership API which has a number of method implemented within it. We will describe them briefly as and when required. If you notice in the code above we have
Roles.GetAllRoles () methodà is used to fetch all the roles from the aspnet_Roles table within the aspnetdb database.

Once all the roles are returned, it is possible that admin would want to add a new role.
Role management’s Role API has a new method CreateRole which takes a single string parameter --> Roles.CreateRole(txtBoxRole.Text);

It is likely that admin might try to add a role that already exists within the aspnet_Roles table and therefore this needs to be checked for before role is added to avoid redundant entries. For that we need to use RoleExists () method implemented within the role class. Roles.RoleExists (txtBoxRole.Text) is the method which checks to see if the role already exists in the table. It return a boolean value i.e. true or false.

This is what we are doing is piece of code below. On the button click of create role, it check to see if the role already exists. If it exists, a message is returned back to user prompting the same. In case it does not exist, it creates a new role using the CreateRole () method.

For that Add the following code to Create Role button:-

For deleting roles we have Role API offers following methods:-
-->
Roles.DeleteRole (String strRole);

This method would delete the role from the aspnet_Roles table in case there are not users assigned to this role. In case users are assigned to this role, then your job would be to remove the users from role and then delete the role. Note that there is difference when we remove users from a role in the fact that the users will be removed only from that specified role and not from the remaining roles. Add the following piece of code to remove role button click event:-

If you noticed, we have used another method --> Roles.GetUsersInRole(string strRole). This method is used to check if the users are contained in that role. If the length of the string is returned is 0, then we can delete the role using Roles.DeleteRole (strRole) method.

In case the length of the string returned is not zero, then we need to remove the users from that role and then delete the role.

Removing users from roles can use any one of the following construct -->

Roles.RemoveUserFromRole (string uname, string rolename)

Roles.RemoveUserFromRoles (string uname, string rolenames ())

Roles.RemoveUsersFromRole (string unames (), string rolename)

Roles.RemoveUsersFromRoles (string unames (), string rolenames ())

In our code, we want to remove users from that role and then delete the role. Therefore, we would be using the third construct -->

Roles.RemoveUsersFromRole(Roles.GetUsersInRole(strRole), strRole);

You can add the logic to the button “ remove role with users” and embed the construct appropriately wherever applicable. And then delete the role using the Roles.DeleteRole (strRole); method.

Managing Roles

Next we are going to discuss how to manage users and roles. That is, how to assign user to role and how to remove the user from role.

The source code for this page is :-

On this page, we have a drop down box which is binded to the SQL data source which in return uses a select query to fetch all the users from aspnet_Users table within the aspnetdb database. In the page_load event we bind the list box with all the Available roles. The code for the same is below :-

Below method gets called as soon after the page is loaded but before the controls are rendered on the page. It fetches all the roles for the first user in the drop down list.

Now, when Admin selects any of the users from the drop down box, we would want to see the roles that are already assigned to him/her. For this we add SelectedIndexChanged event on the drop down list as stated under:-

Before we go any further, look at the various constructs for adding the users:-

Roles.AddUserToRole (string uname, string rolename) --> Add user to a role
Roles.AddUsersToRole (string unames (), string rolename) --> Add multiple users to a role
Roles.AddUserToRoles (string uname, string rolenames ()) -- > Add a user to multiple roles
Roles.AddUsersToRoles (string unames (), string rolenames ()) --> Add multiple users to multiple roles

To add a user to particular role, add the following code to the Add role button click event.
This code checks to see if the user already exists in that particular role which is selected in the second list box against Add Role button. If the role is already assigned to a user, then it prompts for the same. Else the role would be assigned to user using the first construct described above.

Similarly, if you want to remove user from one or more roles you can go ahead using any of the below constructs:-

Roles.RemoveUserFromRole (string uname, string rolename)

Roles.RemoveUserFromRoles (string uname, string rolenames ())

Roles.RemoveUsersFromRole (string unames (), string rolename)

Roles.RemoveUsersFromRoles (string unames (), string rolenames ())


In the code below, we are doing through the items in the list box and removing the user from a particular role. Add the following code to the delete role button click event.

This is all I had to dicuss to in this article. You can drill into the details more by getting a good hold of these basics and moving on to advanced concepts.

Friday, August 12, 2005

Membership in ASP.Net 2.0


ASP.Net 2.0 has come a long way from classic ASP and then ASP.Net 1.1. With every new version are added a bunch of new functionality which not only eases the development of web applications but also keeps up to the required security measures to make the applications less susceptible to external threat. Besides this, we can create a website using file System, FTP server or http server using ASP.Net 2.0. Therefore the machine need not have the IIS running or installed incase you are developing a web site. Thanks to the in-built web server which automatically starts once the application is run. It is only when you are deploying the application in the production server that you would be requiring the IIS.

Before I get into the intricate details of the subject, let me refresh the concept of the authentication and authorization. And how these two are inter-related to the new security features namely Membership and Role Management which is our main topic of discussion.

Authentication is a process where-in the identity of the user is determined. Web applications primarily use Forms Authentication (Intra-net applications could use Integrated Windows Authentication) to verify the identity of the user using the web application. This is mapped to membership service in ASP.Net 2.0

Authorization is the next step where the basic aim is to determine whether the authenticated user has permissions to access the resource. This resource could be a file system or simple .aspx page. Role Management is the new feature that does the job of authorization is ASP.Net 2.0

As a part of my first discussion we will be discussing the basic of membership service:-

Initially, when Whidbey Beta 1 was launched, support for MS-Access and SQL Server was provided. However, now the support for Access has been removed and what we are left is just support of built-in SQL Server (SQL Express) provider. ASP.Net 2.0 is based of a new provider model, hence for membership we have a new membership provider model which acts a layer of abstraction between the underlying data store and the membership API’s.

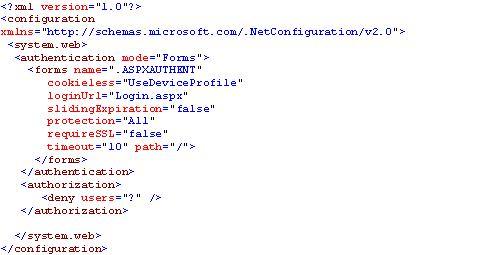
Before you go about using the new server controls and Membership API, you need to setup the web.config file for authentication user credentials. When a web application is created using ASP.Net 2.0, the web.config is not added by default. When the application is run from the IDE, then it prompts as to whether, it should run with or without debugging. If you for the first option i.e. with debugging, the web.config is added to your solution folder else the information would be picked up the machine.config file with the second option.
Because we are working with membership and role management, it would be advisable to add a web.config file to solution folder to enable authentication. Once the web.config is added, add the following section to it.


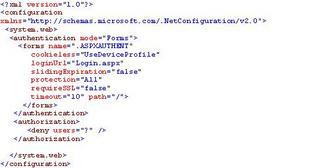
Let discuss what each one of these items means. Setting the mode attribute to Forms turns on the form authentication as in authentication mode="Forms"
With this the User will be asked for credentials on the login page in case he is anonymous (which is the default authentication mode).

The other attributes of the web.config file included as above are:-

name – The name give to the cookie issued to the client once authenticated.
loginUrl – This is the default url to which user will be re-directed to in case he is not authenticated.
Timeout – time after which the cookie gets expired. Default value is 30 minutes.
Path – Path for the cookies.
slidingExpiration - Can either be set to true or false. I have the timeout set to 20 minutes. In case set to false, the cookie gets expired 20 minutes after the first request. In case set to true, it expires 20 minutes after the lat request has been sent.
requiresSSL – can be set to true or false.
protection – Possible values include All, Validation, Encryption or None. This protection is meant for the cookie.


Please note that the web.config is case sensitive.

Once this is done, next step would be to create users. This could be done via two ways i.e. by using the new login server controls or Membership API. For this to work, you need to do create a database that is going to store the user information.
I am explaining everything with respect to SQL Server 2000. So, go to à
“C:\WINDOWS\Microsoft.NET\Framework\v2.0.50215\”, folder which corresponds to your .Net framework 2.0
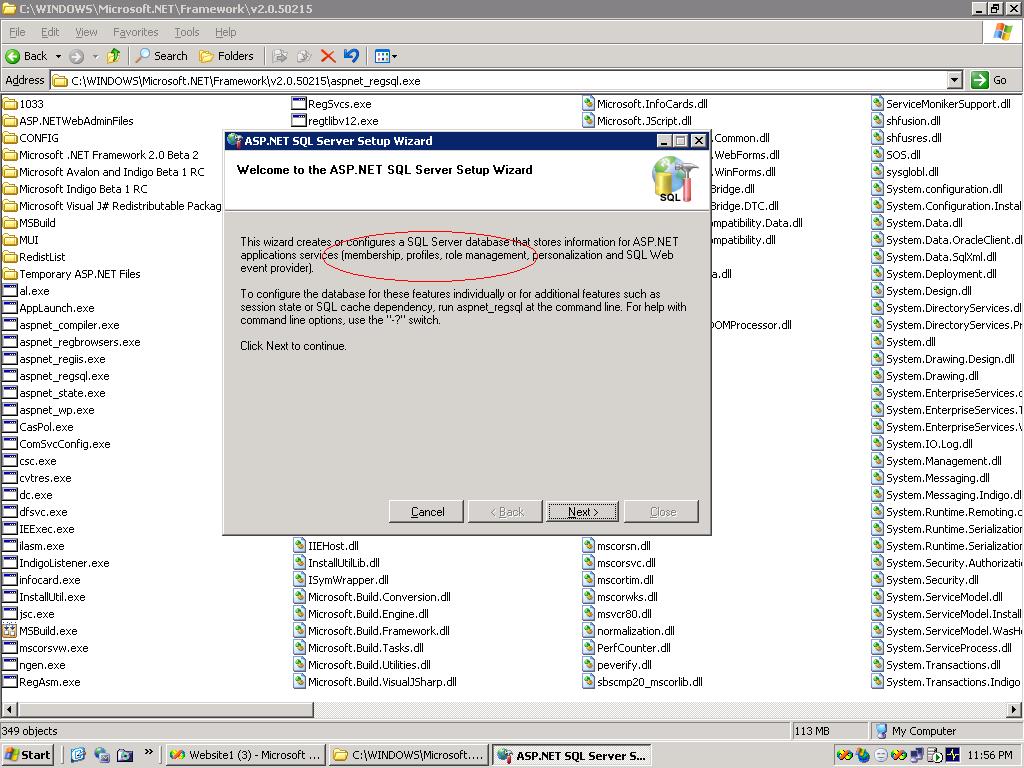
Follow the following steps:-


1. Run the aspnet_regsql.exe utility. A wizard as shown below will open up.

If you notice, it states you can use this wizard to create database for membership.

2. Click Next and select the first radio button which corresponds to configure SQL Server for application services. Click next and let the default settings on the next page. Finally click on Finish button.

Open up the SQL server and you will find a new database is added to the existing list of databases. The name of this database by default is aspnetdb. Run through the set of tables created within the database. Aspnet_Membership is the table that will be used to store and retrieve the information corresponding to users created using the Membership service.

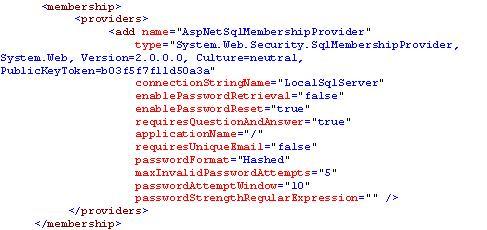
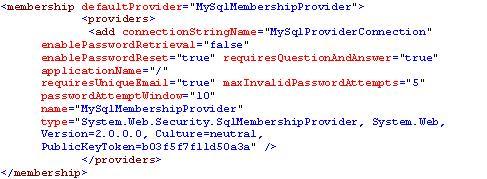
Now we are going to configure the web.config file to use SQL Server 2000 for all membership based operations. Before this, I would like you to visit the machine.config file within --C:\WINDOWS\Microsoft.NET\Framework\v2.0.50215\CONFIG\ folder
Open it with notepad. Find the membership within it. The code corresponding to it would look something like:-

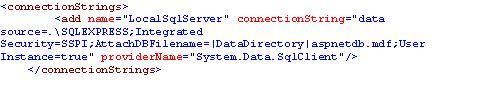
Look at the connectionStringName="LocalSqlServer". This corresponds to the SQLExpress 2005 installed alongwith and not SQL Server 2000 or SQL Server 2005. You can verify this by looking deeply into machine.config file that it would indeed correspond to SQLExpress as indicated below:-

As I stated earlier, in ASP.Net 2.0 default support would be provided for SQLEXPRESS only and no other data store. You will be required to create own provider for any other data store. What we do next is to configure the web.config file to use SQL Server 2000 as your data store.


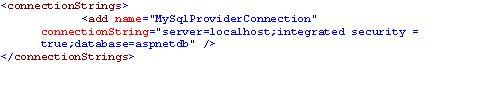
For this, create a new connection string which points to local SQL server 2000 as indicated below:-

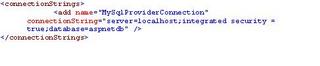
Note that database name is same as what you created using aspnet_regsql.exe utility. If you had created the database with some other name please update the same over here in the connection string. Also note, that connection string specifies localhost as the server i.e SQL Server 2000. Once done, go about adding the following lines above the authentication code within system.web and /system.web tags :-

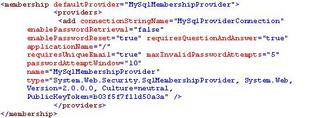
Once you create this provider, make sure that connectionStringName is same as what you specified while create a new connection string. This code won’t wok on your system directly. You need to make some changes besides this as well. Well, I am talking about the type attribute i.e.

type="System.Web.Security.SqlMembershipProvider, System.Web, Version=2.0.0.0, Culture=neutral, PublicKeyToken=b03f5f7f11d50a3a"

This type is analogous to the .Net framework assesmblies installed on your system. What you can for this is to open up your machine.config file and set type attribute as mentioned over there. Please go through the section of the membership provider and make sure that the type in web.config file in membership section is same as that in machine.config file.

For better understanding, go through the sections of what I mentioned earlier and cross-verify that the type is indeed the same.

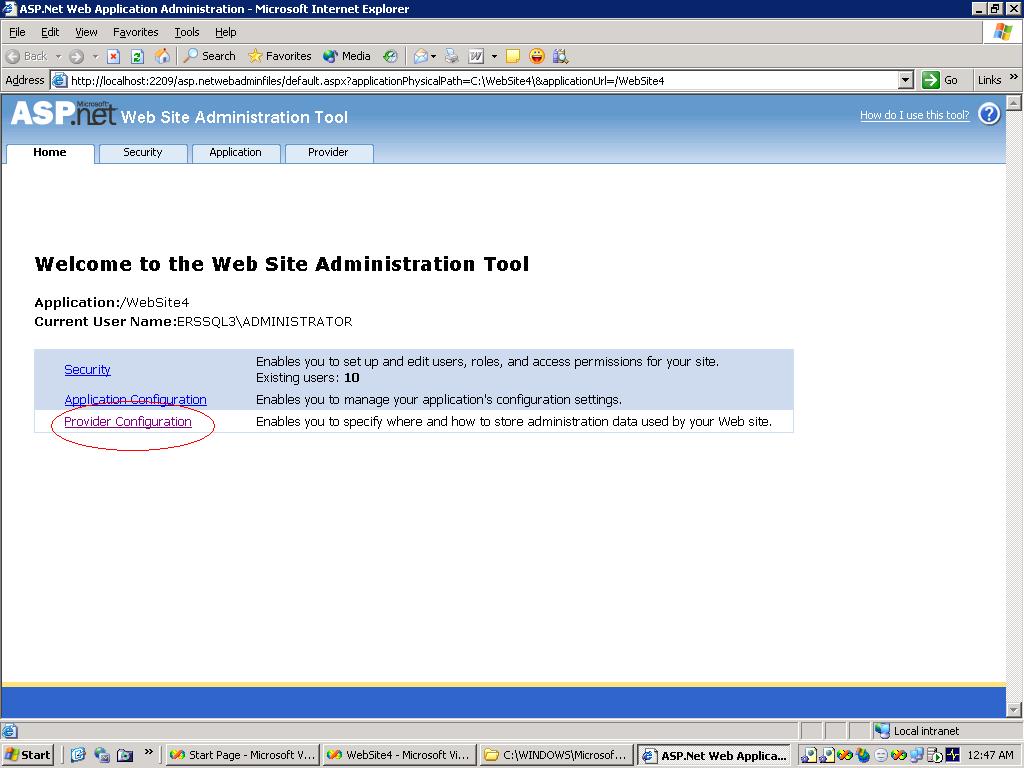
Once you have done this, build the web application. Build succeeds. Navigate to Website --> ASP.Net Configuration in the VS IDE menu. This will start the local administration tool that can be used to creating users once the provider is created. You will have a web site administration page opened up as shown below:-

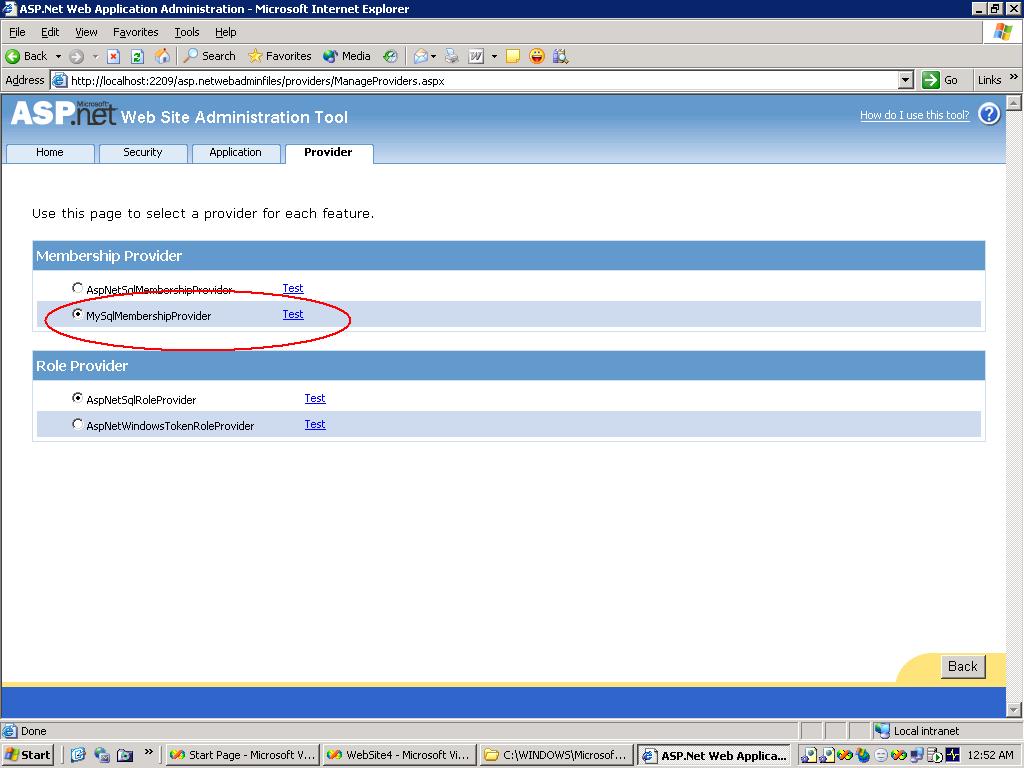
Click on the provider Tab. You will be navigated to page which gives you two options to select from as stated under:-

1. Select a single provider for all site management data.
2. Select a different provider for each feature (advanced)

Go for the second option --> different provider for each feature.

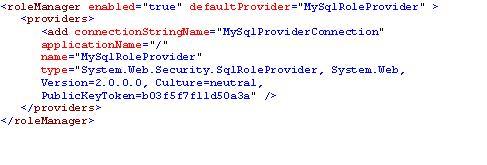
And you will find the provider that we just created i.e.
MySqlProviderConnection is listed under the membership provider

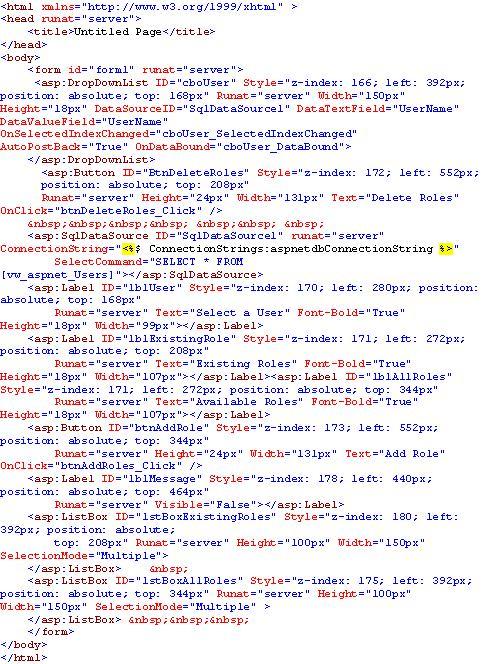
Click on Test to check if connection succeeds. Now, your task of setting up the web.config file for membership is done. Please ignore the Role Provider as of now because we will be considering it as a part of my article on Role Management.

Login Controls

Following are the set of the new login server controls that have been added to ASP.Net 2.0 -->

  • CreateUserWizard
  • ChangePassword
  • Login
  • LoginView
  • LoginName
  • LoginStatus
  • PasswordRecovery

I will be describing some of the above controls :-

CreateUserWizard Server Control

Whenever a user visits website and wants to access the resources within it, then his fist step would be to get registered with the website. This is exactly what the CreateUserWizard server control does.

Once you drag and drop the user control, click on the smart tag that appears next to the control as shown in the figure above. You will have a wizard tasks window opened up where-in the formatting can be done by clicking on Auto Format.
Also click on the drop down box and you will find that create user is a two step process.
First is the sign up for a new account and second being the complete step.

When you sign up and enter the password, it is likely possible that you are prompted for the invalid password. The reason for this is that you need to over ride the requirement of a non-alphanumeric character or the required default length (7 characters). So adding the following should resolve the issue:-

minRequiredPasswordLength="6"

minRequiredNonalphanumericCharacters="0"


Once you are done filling up the information on the first page, click the CreateUser Button. You will be navigated to second step as was described above. This basically gives you the confirmation of the user information being stored.

Clicking on the continue button on the complete setup page would not take you anywhere and the page would be posted back. Hence, what you need to do is to wire up the button click to the ContinueButtonClick event. On the button click, you can specify the url that you would want to navigate to.

You can also create your own customized create user form with the controls that you wish to have on it. Assume that you have a web form with a following text box controls to accept the information from the userà User Name, Password, Confirm Password, Email, Security Question and Answer. And finally a button which when clicked will create a new user.

To begin using the membership API, you need to include the system.web.security namespace which contains the definition of the membership class. Add the following piece of code to the button click event -->


Once the user is created you, can check for the information with the aspnetdb --> aspnet_memerbship table for the updated information.

The number of arguments that membership.CreateUser method takes depends upon the settings in the config file.

Login Server Control

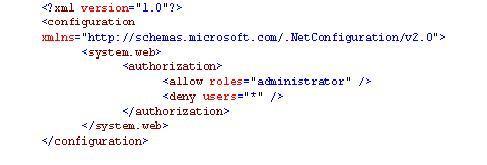
This control basically allows users the user to specify the credentials to autthenticate them. In case the user is anonymous, then he will be denied access because in the web.config file we included a section


which is used to deny access to unauthenticated users to the pages within the web site.

Also, the user will always be re-directed to login page because in the authentication section we specified the loginUrl to be --> “Login.aspx”

Drag and drop a login control from the tool box on the Login.aspx page and format the appearance using the smart tag on the control. You can also change other properties of the control as well using the property window (F4). Login control has a property --> DestinationPageUrl which has to be so that user can be re-redirected to anther page once authenticated.

Similarly, you can use the ValidateUser() method of the Membership class to validate the user on the click of the button on login page.

Syntax -->

Membership.ValidateUser(TxtName.Text.ToString(),TxtPwd.Text.ToString())

LoginName

You must have noticed on some of the web sites where-in once the user logs into the website successfully, a welcome page showing the user name appears.
Well, that is what LoginName control does. It displays the user name with which the user logged in. It is a pretty simple control to use. All you need is to drag and drop this control on the web page you are re-directing to once the user logs in. Say the DestinationPageUrl on the Login server Control was specified as “Home.aspx”. Drop the LoginName control on the Home.aspx page.


Drill into the properties of the loginName control and you look for a property nameà FormatString. Its value is set to {0}. You can add some additional text to that you want to come up as well alongwith a login name. Say --> Welcome : {0}.


LoginStatus Server control

ASP.Net 2.0 has been enhanced so much now and LoginStatus control is one of them that helps you log in or logout of the website on the simple click. No code behind needed for it. You can place this control on everypage i.e. aspx page and you will have something like in source file :-


Clicking Login hyperlink navigates to Login page which hosts the Login Server control. Once you provide the correct credentials and user is authenticated the user is re-directed to DestinationPageUrl as specified for login control. Once successfully logged into the website Login automatically changes to Logout. Clicking on logout will re-direct the user back to login page.

Similarly you can try playing around with the remaining controls and you will find them pretty handy and easy to use.

My next article is on Role Management. Watch out for it. Your comments are highly valued.