
Role Management in ASP.Net 2.0
As stated before, role management service deals with the authorization i.e. granting access and managing roles of each of the user registered with the web site.
Unlike Membership service which can either use the login server controls to achieve the task, role management service does not offer any server controls. All you have are a set of role management APIs within the system.web.security namespace.
Since ASP.Net 2.0 has a provider based model, role management also uses a set of providers for authorization. By default Beta 2 provides support for SQL Express only. For the remaining data stores you have to explicitly create a provider. I’ll be explaining every thing with respect to the SQL Provider that we created earlier for membership provider. To achieve the same, we will be going back to web.config file of our website solution that we created earlier.
Add the following section to the web.config file:-
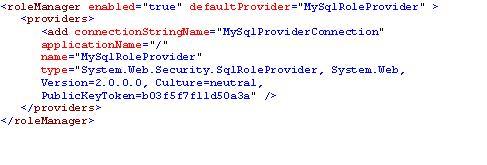
Unlike membership service, role manager needs to enabled explicitly for it to work as specified by enabled="true".
Change the value against the type attribute with what you have in machine.config file as explained before.Also, note the connection string name is same as what we created earlier. For conveniece I am re-writing the same.

aspnetdb is the database which contains table for role managements as well.
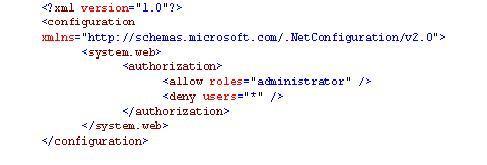
Let’s assume you have folder Admin which has certain pages that should be accessible to only to the user with administrator rights. For this follow the following steps -->
- Create a new web.config file within the Admin folder by right clicking on the folder name and click “Add new Item”. Select the web.config file and click Add.
- Once done, add authorization section so that web.config file within the Admin folder looks something like as stated below -->
3.Now run the ASP.Net website configuration tool once again by navigating to Website--> ASP.Net configuration from the IDE menu. Once the ASP.Net configuration page opens up in the browser click on the provider tab and select link which states “select a different provider for each feature (Advanced)”.
Though I have demonstrated this to you earlier, below screenshot shows the new role provider is added to existing list of providers.

Now your web.config file is all set to use role management service.
Create another web “Manage.aspx” within the admin folder of the website solution. It looks something shown below:-

The source code for the same is:-
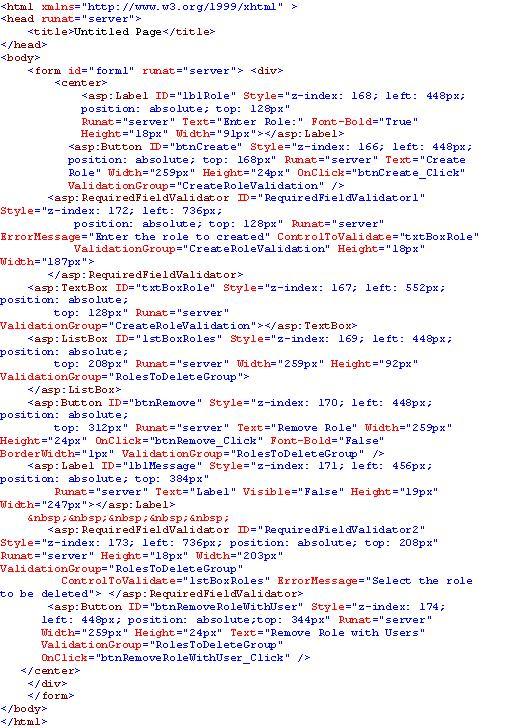
The above code is interface that the user will be presented with when he tries to create a new role or delete role if no user assigned to that role. It also delete role if any user is assigned to it. Please note that when a role is deleted with the users in it, those users would not be deleted from other roles.
When the page is run, it presents the user with the set of existing roles in the listbox.
For that you need to add a page load event with the following code:-
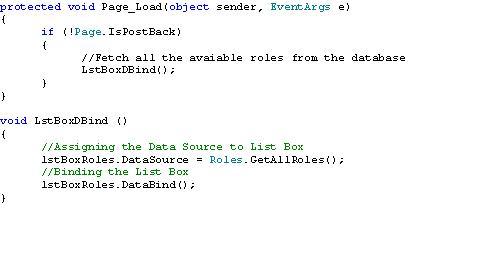
Roles in a membership API which has a number of method implemented within it. We will describe them briefly as and when required. If you notice in the code above we have
Roles.GetAllRoles () methodà is used to fetch all the roles from the aspnet_Roles table within the aspnetdb database.
Once all the roles are returned, it is possible that admin would want to add a new role.
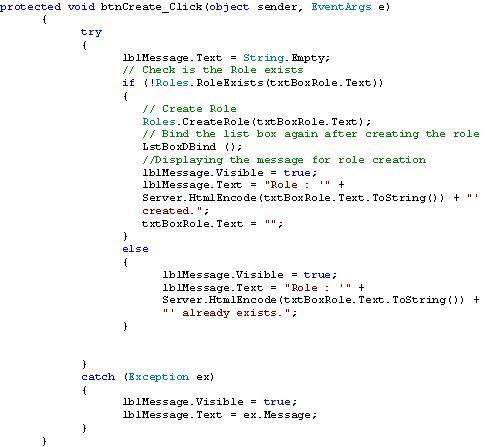
Role management’s Role API has a new method CreateRole which takes a single string parameter --> Roles.CreateRole(txtBoxRole.Text);
It is likely that admin might try to add a role that already exists within the aspnet_Roles table and therefore this needs to be checked for before role is added to avoid redundant entries. For that we need to use RoleExists () method implemented within the role class. Roles.RoleExists (txtBoxRole.Text) is the method which checks to see if the role already exists in the table. It return a boolean value i.e. true or false.
This is what we are doing is piece of code below. On the button click of create role, it check to see if the role already exists. If it exists, a message is returned back to user prompting the same. In case it does not exist, it creates a new role using the CreateRole () method.
For that Add the following code to Create Role button:-
For deleting roles we have Role API offers following methods:-
--> Roles.DeleteRole (String strRole);
This method would delete the role from the aspnet_Roles table in case there are not users assigned to this role. In case users are assigned to this role, then your job would be to remove the users from role and then delete the role. Note that there is difference when we remove users from a role in the fact that the users will be removed only from that specified role and not from the remaining roles. Add the following piece of code to remove role button click event:- 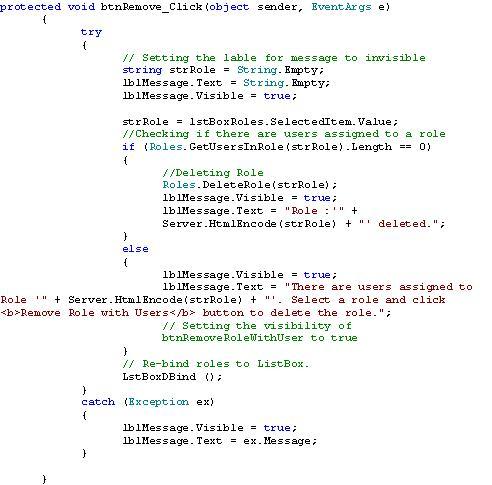
If you noticed, we have used another method --> Roles.GetUsersInRole(string strRole). This method is used to check if the users are contained in that role. If the length of the string is returned is 0, then we can delete the role using Roles.DeleteRole (strRole) method.
In case the length of the string returned is not zero, then we need to remove the users from that role and then delete the role.
Removing users from roles can use any one of the following construct -->
Roles.RemoveUserFromRole (string uname, string rolename)
Roles.RemoveUserFromRoles (string uname, string rolenames ())
Roles.RemoveUsersFromRole (string unames (), string rolename)
Roles.RemoveUsersFromRoles (string unames (), string rolenames ())
In our code, we want to remove users from that role and then delete the role. Therefore, we would be using the third construct -->
Roles.RemoveUsersFromRole(Roles.GetUsersInRole(strRole), strRole);
You can add the logic to the button “ remove role with users” and embed the construct appropriately wherever applicable. And then delete the role using the Roles.DeleteRole (strRole); method.
Managing Roles
Next we are going to discuss how to manage users and roles. That is, how to assign user to role and how to remove the user from role.

The source code for this page is :-
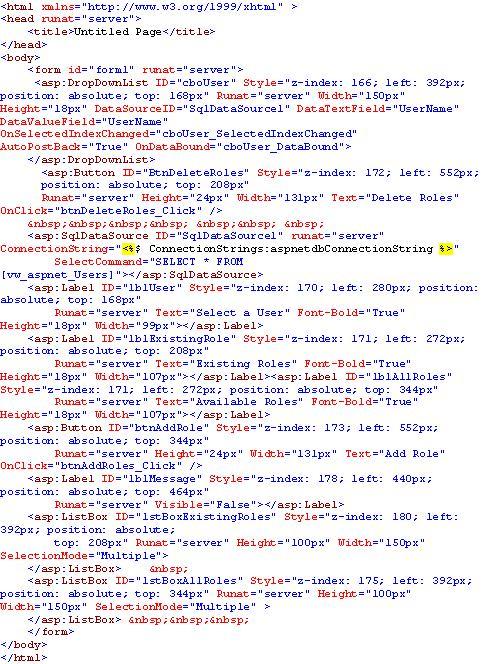
On this page, we have a drop down box which is binded to the SQL data source which in return uses a select query to fetch all the users from aspnet_Users table within the aspnetdb database. In the page_load event we bind the list box with all the Available roles. The code for the same is below :-
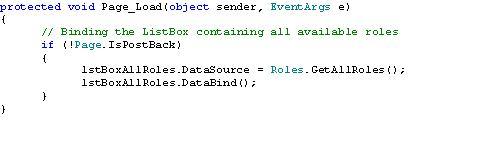
Below method gets called as soon after the page is loaded but before the controls are rendered on the page. It fetches all the roles for the first user in the drop down list.
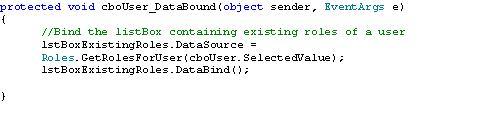
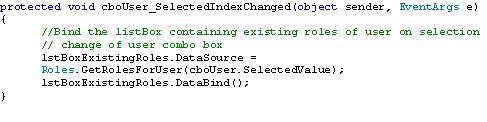
Now, when Admin selects any of the users from the drop down box, we would want to see the roles that are already assigned to him/her. For this we add SelectedIndexChanged event on the drop down list as stated under:-
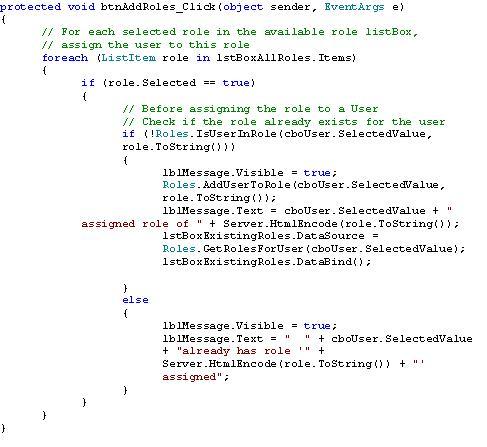
Before we go any further, look at the various constructs for adding the users:-
Roles.AddUserToRole (string uname, string rolename) --> Add user to a role
Roles.AddUsersToRole (string unames (), string rolename) --> Add multiple users to a role
Roles.AddUserToRoles (string uname, string rolenames ()) -- > Add a user to multiple roles
Roles.AddUsersToRoles (string unames (), string rolenames ()) --> Add multiple users to multiple roles
To add a user to particular role, add the following code to the Add role button click event.
This code checks to see if the user already exists in that particular role which is selected in the second list box against Add Role button. If the role is already assigned to a user, then it prompts for the same. Else the role would be assigned to user using the first construct described above.
Similarly, if you want to remove user from one or more roles you can go ahead using any of the below constructs:-
Roles.RemoveUserFromRole (string uname, string rolename)
Roles.RemoveUserFromRoles (string uname, string rolenames ())
Roles.RemoveUsersFromRole (string unames (), string rolename)
Roles.RemoveUsersFromRoles (string unames (), string rolenames ())
In the code below, we are doing through the items in the list box and removing the user from a particular role. Add the following code to the delete role button click event.

This is all I had to dicuss to in this article. You can drill into the details more by getting a good hold of these basics and moving on to advanced concepts.
No comments:
Post a Comment