ASP.Net 2.0 has come a long way from classic ASP and then ASP.Net 1.1. With every new version are added a bunch of new functionality which not only eases the development of web applications but also keeps up to the required security measures to make the applications less susceptible to external threat. Besides this, we can create a website using file System, FTP server or http server using ASP.Net 2.0. Therefore the machine need not have the IIS running or installed incase you are developing a web site. Thanks to the in-built web server which automatically starts once the application is run. It is only when you are deploying the application in the production server that you would be requiring the IIS.
Before I get into the intricate details of the subject, let me refresh the concept of the authentication and authorization. And how these two are inter-related to the new security features namely Membership and Role Management which is our main topic of discussion.
Authentication is a process where-in the identity of the user is determined. Web applications primarily use Forms Authentication (Intra-net applications could use Integrated Windows Authentication) to verify the identity of the user using the web application. This is mapped to membership service in ASP.Net 2.0
Authorization is the next step where the basic aim is to determine whether the authenticated user has permissions to access the resource. This resource could be a file system or simple .aspx page. Role Management is the new feature that does the job of authorization is ASP.Net 2.0
As a part of my first discussion we will be discussing the basic of membership service:-
Initially, when Whidbey Beta 1 was launched, support for MS-Access and SQL Server was provided. However, now the support for Access has been removed and what we are left is just support of built-in SQL Server (SQL Express) provider. ASP.Net 2.0 is based of a new provider model, hence for membership we have a new membership provider model which acts a layer of abstraction between the underlying data store and the membership API’s.
Before you go about using the new server controls and Membership API, you need to setup the web.config file for authentication user credentials. When a web application is created using ASP.Net 2.0, the web.config is not added by default. When the application is run from the IDE, then it prompts as to whether, it should run with or without debugging. If you for the first option i.e. with debugging, the web.config is added to your solution folder else the information would be picked up the machine.config file with the second option.
Because we are working with membership and role management, it would be advisable to add a web.config file to solution folder to enable authentication. Once the web.config is added, add the following section to it.
Let discuss what each one of these items means. Setting the mode attribute to Forms turns on the form authentication as in authentication mode="Forms"
With this the User will be asked for credentials on the login page in case he is anonymous (which is the default authentication mode).
The other attributes of the web.config file included as above are:-
name – The name give to the cookie issued to the client once authenticated.
loginUrl – This is the default url to which user will be re-directed to in case he is not authenticated.
Timeout – time after which the cookie gets expired. Default value is 30 minutes.
Path – Path for the cookies.
slidingExpiration - Can either be set to true or false. I have the timeout set to 20 minutes. In case set to false, the cookie gets expired 20 minutes after the first request. In case set to true, it expires 20 minutes after the lat request has been sent.
requiresSSL – can be set to true or false.
protection – Possible values include All, Validation, Encryption or None. This protection is meant for the cookie.
Please note that the web.config is case sensitive.
Once this is done, next step would be to create users. This could be done via two ways i.e. by using the new login server controls or Membership API. For this to work, you need to do create a database that is going to store the user information.
I am explaining everything with respect to SQL Server 2000. So, go to à
“C:\WINDOWS\Microsoft.NET\Framework\v2.0.50215\”, folder which corresponds to your .Net framework 2.0
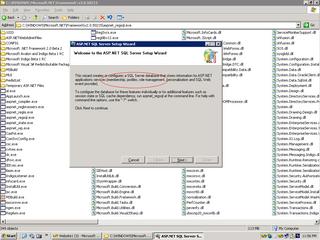
Follow the following steps:-
2. Click Next and select the first radio button which corresponds to configure SQL Server for application services. Click next and let the default settings on the next page. Finally click on Finish button.
Open up the SQL server and you will find a new database is added to the existing list of databases. The name of this database by default is aspnetdb. Run through the set of tables created within the database. Aspnet_Membership is the table that will be used to store and retrieve the information corresponding to users created using the Membership service.
Now we are going to configure the web.config file to use SQL Server 2000 for all membership based operations. Before this, I would like you to visit the machine.config file within --C:\WINDOWS\Microsoft.NET\Framework\v2.0.50215\CONFIG\ folder
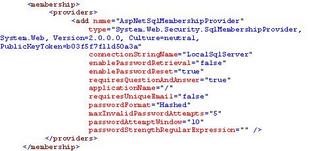
Open it with notepad. Find the membership within it. The code corresponding to it would look something like:-
Look at the connectionStringName="LocalSqlServer". This corresponds to the SQLExpress 2005 installed alongwith and not SQL Server 2000 or SQL Server 2005. You can verify this by looking deeply into machine.config file that it would indeed correspond to SQLExpress as indicated below:-
As I stated earlier, in ASP.Net 2.0 default support would be provided for SQLEXPRESS only and no other data store. You will be required to create own provider for any other data store. What we do next is to configure the web.config file to use SQL Server 2000 as your data store.
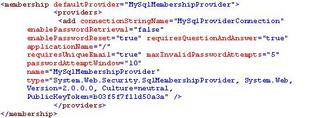
For this, create a new connection string which points to local SQL server 2000 as indicated below:-
Note that database name is same as what you created using aspnet_regsql.exe utility. If you had created the database with some other name please update the same over here in the connection string. Also note, that connection string specifies localhost as the server i.e SQL Server 2000. Once done, go about adding the following lines above the authentication code within system.web and /system.web tags :-
Once you create this provider, make sure that connectionStringName is same as what you specified while create a new connection string. This code won’t wok on your system directly. You need to make some changes besides this as well. Well, I am talking about the type attribute i.e.
type="System.Web.Security.SqlMembershipProvider, System.Web, Version=2.0.0.0, Culture=neutral, PublicKeyToken=b03f5f7f11d50a3a"
This type is analogous to the .Net framework assesmblies installed on your system. What you can for this is to open up your machine.config file and set type attribute as mentioned over there. Please go through the section of the membership provider and make sure that the type in web.config file in membership section is same as that in machine.config file.
For better understanding, go through the sections of what I mentioned earlier and cross-verify that the type is indeed the same.
Once you have done this, build the web application. Build succeeds. Navigate to Website --> ASP.Net Configuration in the VS IDE menu. This will start the local administration tool that can be used to creating users once the provider is created. You will have a web site administration page opened up as shown below:-
Click on the provider Tab. You will be navigated to page which gives you two options to select from as stated under:-
1. Select a single provider for all site management data.
2. Select a different provider for each feature (advanced)
Go for the second option --> different provider for each feature.
And you will find the provider that we just created i.e.
MySqlProviderConnection is listed under the membership provider
Click on Test to check if connection succeeds. Now, your task of setting up the web.config file for membership is done. Please ignore the Role Provider as of now because we will be considering it as a part of my article on Role Management.
Login Controls
Following are the set of the new login server controls that have been added to ASP.Net 2.0 -->
- CreateUserWizard
- ChangePassword
- Login
- LoginView
- LoginName
- LoginStatus
- PasswordRecovery
I will be describing some of the above controls :-
CreateUserWizard Server Control
Whenever a user visits website and wants to access the resources within it, then his fist step would be to get registered with the website. This is exactly what the CreateUserWizard server control does.
Once you drag and drop the user control, click on the smart tag that appears next to the control as shown in the figure above. You will have a wizard tasks window opened up where-in the formatting can be done by clicking on Auto Format.
Also click on the drop down box and you will find that create user is a two step process.
First is the sign up for a new account and second being the complete step.
When you sign up and enter the password, it is likely possible that you are prompted for the invalid password. The reason for this is that you need to over ride the requirement of a non-alphanumeric character or the required default length (7 characters). So adding the following should resolve the issue:-
minRequiredPasswordLength="6"
minRequiredNonalphanumericCharacters="0"
Once you are done filling up the information on the first page, click the CreateUser Button. You will be navigated to second step as was described above. This basically gives you the confirmation of the user information being stored.
Clicking on the continue button on the complete setup page would not take you anywhere and the page would be posted back. Hence, what you need to do is to wire up the button click to the ContinueButtonClick event. On the button click, you can specify the url that you would want to navigate to.
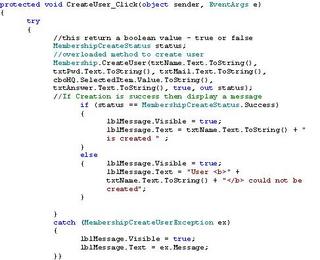
You can also create your own customized create user form with the controls that you wish to have on it. Assume that you have a web form with a following text box controls to accept the information from the userà User Name, Password, Confirm Password, Email, Security Question and Answer. And finally a button which when clicked will create a new user.
To begin using the membership API, you need to include the system.web.security namespace which contains the definition of the membership class. Add the following piece of code to the button click event -->
Once the user is created you, can check for the information with the aspnetdb --> aspnet_memerbship table for the updated information.
The number of arguments that membership.CreateUser method takes depends upon the settings in the config file.
Login Server Control
This control basically allows users the user to specify the credentials to autthenticate them. In case the user is anonymous, then he will be denied access because in the web.config file we included a section

which is used to deny access to unauthenticated users to the pages within the web site.
Also, the user will always be re-directed to login page because in the authentication section we specified the loginUrl to be --> “Login.aspx”
Drag and drop a login control from the tool box on the Login.aspx page and format the appearance using the smart tag on the control. You can also change other properties of the control as well using the property window (F4). Login control has a property --> DestinationPageUrl which has to be so that user can be re-redirected to anther page once authenticated.
Similarly, you can use the ValidateUser() method of the Membership class to validate the user on the click of the button on login page.
Syntax -->
Membership.ValidateUser(TxtName.Text.ToString(),TxtPwd.Text.ToString())
LoginName
You must have noticed on some of the web sites where-in once the user logs into the website successfully, a welcome page showing the user name appears.
Well, that is what LoginName control does. It displays the user name with which the user logged in. It is a pretty simple control to use. All you need is to drag and drop this control on the web page you are re-directing to once the user logs in. Say the DestinationPageUrl on the Login server Control was specified as “Home.aspx”. Drop the LoginName control on the Home.aspx page.
Drill into the properties of the loginName control and you look for a property nameà FormatString. Its value is set to {0}. You can add some additional text to that you want to come up as well alongwith a login name. Say --> Welcome : {0}.
LoginStatus Server control
ASP.Net 2.0 has been enhanced so much now and LoginStatus control is one of them that helps you log in or logout of the website on the simple click. No code behind needed for it. You can place this control on everypage i.e. aspx page and you will have something like in source file :-

Clicking Login hyperlink navigates to Login page which hosts the Login Server control. Once you provide the correct credentials and user is authenticated the user is re-directed to DestinationPageUrl as specified for login control. Once successfully logged into the website Login automatically changes to Logout. Clicking on logout will re-direct the user back to login page.
Similarly you can try playing around with the remaining controls and you will find them pretty handy and easy to use.
My next article is on Role Management. Watch out for it. Your comments are highly valued.


No comments:
Post a Comment